When to Hand-raise & When to Leave Them Be
 As the Lafeber’s formula label reads, “Hand-feeding pet birds requires love, patience, and proper nutrition.” The way to successfully raise Finches by hand is to devote as much time as possible to the endeavor to both increasing your survival rate through multiple feedings and to socializing and hand-training your babies. This ensures their health and development as well as their ability to bond well with you and other human beings in the future.
First, I must say it to the point where it’s ingrained in every reader’s mind ~ you should never remove baby Finches or any other baby animal from their parents’ care. Period. It’s not only traumatic for the baby (especially after the imprinting process has begun) but it is just as traumatic for the parents. Pairs who regularly have their babies removed, picked up by human hands, or peeked at will often times stop laying altogether or start to toss/abandon their young. If your goal is to provide your birds with the best care possible, then it is vital to allow them to complete the parenting process as they are naturally inclined to (this includes the weaning process). The only time I will remove eggs or babies is if they have been abandoned or neglected, and that is the only time I would recommend “stepping in” to save the lives of the offspring. That is the responsibility of every breeder.
As with everything else in life things do not always go as planned. Parents will abandon their babies/eggs as a result of the slightest bit of stress or if they are young and inexperienced. They will also toss babies out of the nest if they don’t feel they have enough resources to support them all. (This is especially common with very fertile pairs on vitamin supplements who have 5-6 in each clutch or more.) If eggs/babies are truly abandoned, I will remove them and place them in the brooder to be hand raised. Even if they are left alone by their parents for an extended period of time, they may still be saved. I have seen eggs sit at room temperature for a day or so before being rescued and still hatch to be healthy birds. Often times a seemingly “tossed” baby has simply just fallen out of the nest due to a nest being too small or too many babies pushing each other around are inside. Always try to place the baby back in the nest before you “rescue” it. If by the time they will need their next feeding (1 hour) you do not notice the parents trying to get back into the nest to feed or be with the baby it is probably a safe bet that you will need to raise them yourself. A good way to help encourage parents to feed their babies is to provide them with some hard-boiled egg.
 If you are only looking to hand-raise Finches to have hand-tame pets for yourself or to sell, at least wait until the babies have fledged. This will give them a much greater chance at survival and provide a small chance at socialization with other birds. Another option would be to stimulate and remove “extra eggs” to be hand-raised. A Zebra Finch can lay up to 8-10 eggs if you continuously remove all but 1-2 of their eggs at a time. Hens will continue to lay fertile eggs to cover the loss in an attempt to have a clutch of about 2-4 as their instincts instruct. This can also be done to maximize the amount of babies you are able to have from each clutch, therefore you are able to produce almost the same amount of babies in one clutch which would usually take a few clutches per breeding season to accomplish. This should be used to maximize your offspring while minimizing the stress on your hens since you are then able to meet your requirements or desires in a fraction of the clutches. Also note that hand raising Finches often ends in death for most people who attempt it, and even if it doesn’t they may lack socialization skills with regards to other birds so don’t take the decision to hand raise lightly.
If your Finches are laying more than 3-4 fertile eggs in each clutch, then it is a good idea to remove the extra eggs and place them under a foster pair if possible. If not, then I recommend hand-raising the extra eggs to ensure the survival of both babies and parents alike. The amount of stress on parents multiplies with each baby, and while 4 might be pushing it 5 or 6 can be too large of a burden. In the wild their clutches range from 1-3 hatchlings as a result of laying about 4-6 eggs (or less) which they will lay as part of their instincts to broaden their chances of producing offspring. Finches can lay up to 8 or more eggs at a time (over the span of a few days or so) but that is an evolutionary measure to increase the chance of laying fertile eggs or to replace lost ones and usually occurs if the eggs are repeatedly removed to stimulate more laying. If you are supplementing your bird’s diet with nutrients that increase their fertility then it is also your responsibility to regulate the size of the clutches they are laying. Generally after a few clutches you will get a feel for the typical size your pair(s) each prefer and will consistently lay.
Also note that stimulating or allowing your hens to lay also puts the burden on you as a breeder to provide them with the replenished nutrients they need to make it through the breeding season. The more fresh foods, vitamins and diversity you introduce into their diet, the healthier they will be. This also eliminates the risks of complications such as egg binding.
The “One hour window” & 24/7 Care
 Next let me say that committing to raising birds by hand is quite literally a full-time job. You will need to take them everywhere you go, or only leave them alone for an hour at a time or less. Even when they become older, I check on my babies every hour or every other hour because that is usually the window of time to allow any issues to be corrected. If something happens and you check on your babies within the hour or so you are far more likely to be able to help them or even save their lives in some cases. Even if you have an automatic brooder, you will still need to check on your babies just as often in the event of a product malfunction or other variable. This works really well for about the first week and helps ensure their health and safety.
This is not a reasonable requirement for 24 hours a day for 2 weeks straight however. Nightly feedings are a great opportunity to check on your babies. Even if you raise them perfectly for a week, they are still so fragile they can die in a matter of hours or minutes so the more often you check on them without disrupting their brooding or incubation settings the better.
Hand-feeding Formulas & Additional Nutritional Boosts
 As far as hand-feeding formula goes, there are multiple options. The most popular is the Kaytee formula since it is so cheap and accessible – found at most pet stores. This formula however is not designed for Finches, it’s made for parrots and similar species so it does not provide hatchlings with the balanced nutrients that are right for them.
The Kaytee company has experienced a number of lethal recalls in the past few years, including one for their hand-feeding formula. That is the reason why I recommend against using all of their products ~ especially the hand-feeding formula since they are not reliable.
The Lafeber’s hand-feeding formula is a much better product and is easily purchased online through many pet supply stores including LG.
There are a number of home-made hand-feeding formulas, but the most popular by far has to be infant-formula applesauce with rice cereal or Gerber’s baby food (jars not boxes). Some also recommend using Pedialyte. If you intend to try this, note that since it contains dextrose it may cause a yeast infection (for cures and preventative measures, see below). In the end it is up to every owner to decide what is best for them based on their finances and mobility. Be sure to use a hand-feeding formula that is accessible, reliable and optimal for Finches.
 It is incredibly easy and common for hatchlings to end up with yeast infections which can be fatal. For this reason, I add Avian Vet Dr. Rob Marshall’s Megamix to my hand-feeding formula and to all parent’s baths. For a baby-safe mix, dilute 3mL per 1L and add this as water to your formula mix per the instructions. Even if diluted, Megamix still needs to be stored in the fridge and tossed after 3 days.
Another additional nutritional boost for babies is Avian Trio, which is bee pollen, royal jelly and bee propolis. Mix in small amounts until you gradually are adding 1/8 of a teaspoon in one feeding per day every other day. Graduate to 1/4 serving when they have weaned (on soft food such as sprouted seed). Avian Trio, like Megamix, also needs to be refrigerated and is found at LG.

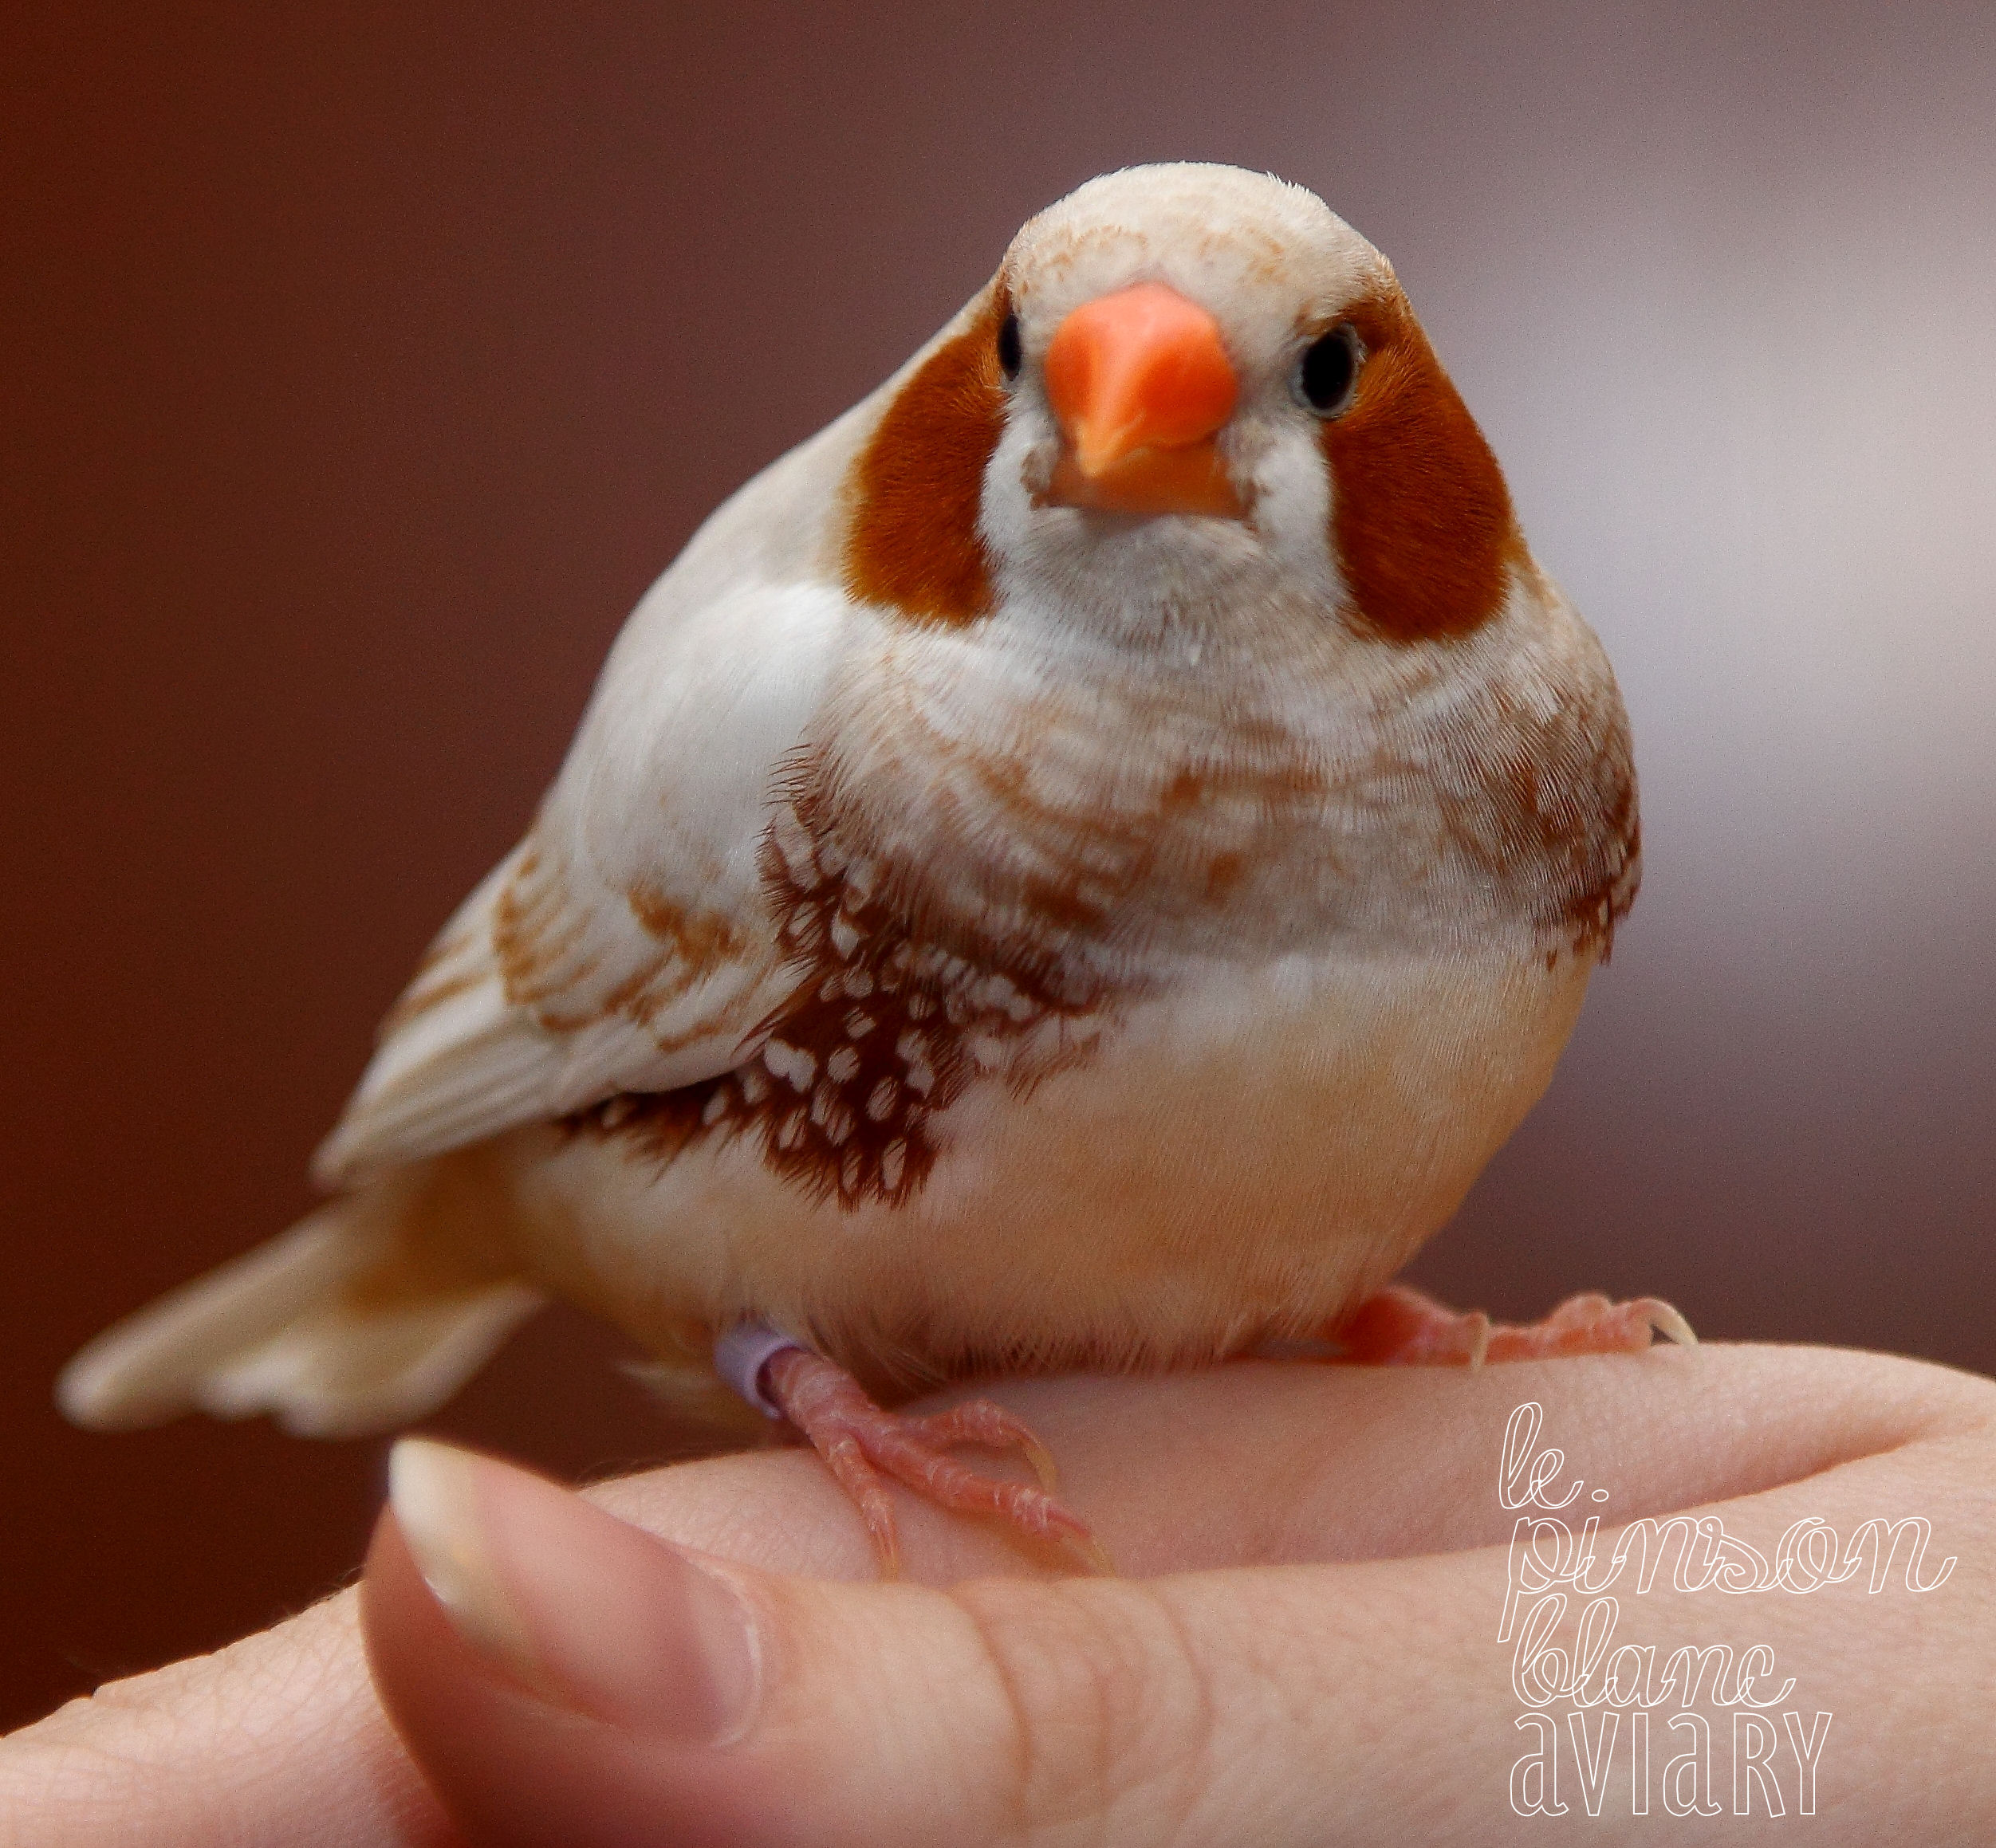
In this close-up you can see my male Phaeo’s crop is full, just barely visible as he sits at an angle. The crop should appear full but not about to pop and should not appear to be uncomfortably over-inflated.
When you’re hand-feeding babies it’s easy for first-time human parents to be confused as to what amount is “enough.” It is true that they only eat the equivalent of a few seeds at a time at first, but their crop should appear to be full after each meal ~ they should look like they’re wearing little inflated balloons around their necks. I recommend feeding babies only a drop or mouthful at a time to avoid choking (“crop feeding” which is inserting the food directly into the crop can be dangerous). It’s also a good idea to try to allow babies to totally digest the food in their crops nightly before feeding them again if possible while still allowing the appropriate amount of time between feedings (don’t starve them). This eliminates all of the previous bacteria/ foods and flushes out the crop to help prevent “sour crop,” yeast/other bacteria infections. Some even recommend not feeding babies at all at night but it greatly increases their chance at survival so it is a choice every breeder has to make. Be careful not to damage their crop by over-feeding ~ this can result in “bags” permanently hanging from the sides of the Finch’s neck.
The first few feedings should be about a drop or two of formula, water or Pedialyte. WAIT to feed babies until they are begging with their mouths wide open to avoid choking, tap on their beak to promote begging or on their rear end (which can also promote defecation so be careful what you wish for!). DO NOT feed Finches for the first 12-24 hours after they hatch (or until after their first poop). You can feed them a tiny amount of water (plain water without any added nutrients) but no food until they have digested the yellow sac in their abdomen. Failure to follow this will result in hatchling death due to yolk sack poisoning. Formula should always be served at room temperature. Cold formula will create air in the crop. If this happens wait until the food is digested or the bubbles disappear to feed again. If this doesn’t work then try it again at night (let them digest the food entirely before the first night feeding if applicable).
Keep hatchlings’ skin and feathers clean and wipe away any formula that isn’t eaten. If needed, use a wet Q-tip and remember to always keep their eyes and nostrils clear. Be sure to mix your formula at the right consistency, the wrong consistency or the wrong amount given at one time can result in aspiration of the mix and suffocation/death. Also make sure that your babies are warm before, during and after feedings. They will die if you do not properly maintain their correct temperature. Always use a fresh batch of formula for each feeding to prevent bacteria from growing in the mix and infecting babies. If babies are too hot or become dehydrated, they will have a dark red skin tone and will appear to “pant” but if they’re too cold you will notice them pale, become sluggish or shiver.
Home-made VS Automatic (R-com) Brooders
After my last long-distance move, the R-Com Mini Brooder joined my Nikon D80 among a couple of smashed lamps and other things in the broken item graveyard aka the trash bin. I hadn’t needed it in a while thanks to the wonderful parenting skills of my pairs and fosters but I knew I’d need a replacement eventually. I’ve always wanted to try to create and use a home-made brooder so I thought this would be a perfect opportunity.
 I started with this tutorial from a Bourke breeder in Oregon which depicts a standard incubation box design and made a few adjustments. I used a thick cardboard box instead of a nest box since wood conducts heat and that may lead to overheating or other issues in a warm bird room like ours during the day when there are multiple UVA/UVB lights on. I used a Mylar blanket instead of foil for insulation, and a thermometer that has a built-in humidity reader so I didn’t have to worry about a “wet bulb” reading. I also used a spare travel cage grate for the baby box to sit on and left a little overhang for a shelf which proved to be very handy for holding things like extra substrate, Q-tips, syringe feeders, etc. The baby box itself I fashioned from a spare cardboard box but a square tissue box cut to be shallow would also be great. I wrapped it in newspaper to keep it insulated and to protect the babies/eggs from being overheated too easily. I cut the bottoms off of a couple of 1L pastic bottles for the water dishes and set them in the bottom of the brooder under the grate to increase the humidity. Lastly I used a couple of 2L plastic bottles fashioned together for a see-through lid.
Overall the home-made brooder seemed to work just fine after the initial calibration. It was a lot more difficult than a “set and go” model due to the fluctuation in temperature. Constant checks during each feeding and in between ensured that it would stay just right. The one drastically negative aspect to this type of incubator has been that it is so unreliable with large fluctuations in temperature that even if I checked it every few hours there were still huge changes. I used this brooder starting in Mid-Spring/Early Summer which is a difficult time for the climate locally.

Here, we were going through days where the sun was blazing hot at 80 degrees Fahrenheit during the middle of the day while some nights were still below 45 or even 35 degrees. This resulted in suddenly dropped brooder temperatures on more than a few nights on an unpredictable basis even if the weather was tracked ahead of time and the thermometer checked regularly in between feedings. The local weather may at times have a high and low variance of about 30 degrees throughout the year as I’m told depending on the climate trend of recent years. Since my bird room runs on its own heating, cooling, air filtration and lighting systems it’s a lot more difficult to regulate the temperature inside of the room than simply setting a thermostat (machines and lights = extra heat) but for adult pairs and hatchlings in their nests it is very easy to do with lights and a fan or air conditioner. For the home-made brooder, not so much. If it dropped to 75-70 degrees at night the brooder would drop to 90 or lower which can be fatal for hatchlings.
Another issue with regards to the home-made brooder maintaining its temperature was the fact that it did not “automatically” keep its settings if it was unplugged and then plugged back in again, or if the power was reset it didn’t always turn back on. There were times when it needed to be unplugged and plugged back in again. It also takes a home-made brooder more time to heat back up to its needed temp while an automatic one only needs to regain power to restore its saved settings.
 Of course it goes without saying that after you’ve poured your heart into hand-feeding a baby night and day for what feels like the longest week you’ve ever lived (thanks to hourly feedings) and you lose even a fraction of your hatchlings it is one of the most heart-breaking and gut-wrenching experiences. I gave up on the home-made brooder after I was unsure if it was the direct result of the loss of a couple of “runt” hatchlings and rush delivered a new R-Com. They were behind developmentally and may have not survived regardless but I will always wonder if it was the result of a drop in brooder temp. If you live in a more mild or stable climate however say in the Southeast US or Southern California then it would probably be incredibly easy to maintain a home-made brooder temperature when the climate is a constant 80 and sunny. It is no coincidence that people in these areas keep outdoor colony-style aviaries with great success.
Regardless of what type of brooder you end up using, if you don’t have enough humidity inside it your eggs won’t hatch or won’t finish hatching. This is especially hard to do with home-made brooders since the average indoor humidity ranges from about 30-40% (or less with multiple sun-grade cage lights), while optimum levels for eggs and babies can range from 50-60%. You wouldn’t think 5-10% would make that much of a difference, but it is the difference between life or death for unhatched babies.
Human Socialization

2 Hand-raised babies who were socialized since they were raised from day 2 ~ My little hen here is affectionately pecking me and making her way to her favorite spot – my neck!
One of the best aspects of raising birds by hand is the special bond you create with your babies. If this process is done correctly, you will also enable the birds to socialize with any humans they may meet in the future.
Socialization should be started from day 1, but it matters most after their eyes have opened around day 6-10. This is when they begin their filial imprinting process – which is where they learn to recognize and bond with their parents. It is important to spend about a half hour or more (an hour is optimum) in between feedings where you are petting and socializing with the babies. I recommend doing this about a half hour to an hour after they are fed so they will not be begging.
You can (very!) gently rub babies and softly use your finger nails on their feathers and skin to show affection. This can also help to remove the coating on their pin feathers to help them fluff out. They may seem opposed to touching at first and will try to move away ~ this is natural and should not be discouraging. Simply keep the babies in the palm of your cupped hand and gently move them with your fingers to keep them from jumping or walking off. They will naturally shake out their feathers as they begin to grow in and stretch their wings, eventually wanting to explore outside of their nest gradually increasingly. The more often you touch them the more they will become used to and enjoy the act. Remember to be very gentle and try to touch the babies at an angle that does not risk “squishing” them such as the sides of their body or sides of their head. Always remember to wash your hands before touching babies and to keep them warm outside of their brooder.
Natural Selection
Another variable to consider when hand-raising babies is the fact that you are eliminating nature’s ability to step in, otherwise known as natural selection. By definition through natural selection parents are able to tell if a baby is behind developmentally and will choose to stop feeding it or push it out of the nest. Through hand-raising we eliminate that process, at times enabling a weaker or deformed baby to live when it would have otherwise died in the hands of nature.
In the case of extreme disease or disability, breeders have to decide whether or not to “cull” or kill the baby. It sounds like a harsh judgement to decide but it is necessary if they are experiencing pain or a slow death process. Many times birds with disabilities will go on to lead happy lives for years before it is their time to go. Of course culling is not an option for older or mildly sick birds but should only be carried out at the recommendation of an Avian Veterinarian and after all other options have been carried out to try to heal the bird or save its life.

A blind special needs baby Zebra Finch enjoying a trip to the park and a nap in the warm sun.
Here at TWFA, we have seen our fair share of deformities and disabilities both by working with rehabilitation and through breeding. As I said it is not always necessary to kill the bird and often special needs Finches will go on to live happy lives. The one time I did encounter a deformity through breeding it was most likely due to the lineage of the pair of parent Finches. After a few successful clutches, one of their babies was born with Bilateral Anophthalmia (which means she was born without eyes). The pair was separated to prevent any future deformities although it may have simply been a fluke of nature. In any case the baby needed to be hand raised since feeding time resulted in a lot of thrashing about and moving around. After being raised for a few months by me, a local hobbyist friend who was more experienced in raising birds with disabilities happily adopted her and went on to raise her successfully. She was such a sweet bird with a wonderful love of life and I would have never even considered culling her simply because she was deformed.
From what I’ve personally experienced, if a baby is developmentally behind or naturally much weaker than its clutchmates then it will probably not survive in the long run. With tiny hatchlings this will become apparent around day 5-7. This is what I call “the hump.” Once a baby makes it over the hump and finishes opening its eyes, that is a good sign they will grow up to be healthy and happy. Usually if there is a baby that is weaker than the rest and unable to survive then it will be the last to hatch. A good sign that you have done everything you can to take care of the baby but it was not destined to live is if it passes away in its sleep and with a crop containing food. “Runts” as I call them aka the last to hatch are weaker in a clutch of 5-7 or more than they are in a clutch of 3-4. This may be due to some variables in incubation or other unforeseen factors. If I have a clutch of 3-4 then generally I don’t expect any deaths at all however. Runts are especially prevalent if you are using fertility supplements which drastically increase clutch size.
That is not the only milestone where you may or may not lose young due to unexplained or unavoidable variables. The second is after the babies have fledged. If they are eating but not gaining weight, this is known as a “failure to thrive.” If the cause of these issues is genetics then multiple babies will end up affected. If it is a fluke then it will occur in a single baby instead of an entire clutch. Always separate parents who give birth to offspring with deformities to be safe.
A Rewarding Experience
The process of hand-raising is incredibly taxing, tedious and yet it is one of the most rewarding experiences you can imagine to raise a baby bird from an egg. Through the process of filial imprinting, hand-raised Finches bond very closely with their human “mother(s).” Your other Finches and birds will take notice if you successfully hand raise babies. You may even notice a new respect from your flock and a new eagerness or interest in socializing with you. Raising baby birds from birth also gives you a different perspective on life and nature. As the aviculturist saying goes ~ no birds, no life; know birds, know life.
Additional tips, tricks & facts for hand-feeding:
- “Nestling food,” “Rearing food,” “Softbill bird food,” or “Egg food” from pet stores are NOT SUFFICIENT HAND-FEEDING FORMULAS FOR FINCHES
- Eggs take about 14 days to hatch and about 24 hours to complete the hatching process after pipping ~ Babies fledge at around 1.5-2 weeks of age, are weaned 1-2 weeks after that and will complete their first molt at about 2 months if given the proper nutrients
- Incubators should be set at around 95-98 degrees Fahrenheit with 50-60% humidity
- Scented paper products such as toilet paper and paper towels can kill babies if used as substrate ~ Go with the plain store brand 2-ply
- Feeding sprouted seed or egg soft food after 2 weeks of age will encourage babies to eat on their own
- If it has been 48 hours since the egg started pipping, try helping the baby out of its shell ~ usually after this window of time is when they will die (the reason for not being able to hatch completely may be due to an incorrect humidity %)
- If you see a hatchling becoming sluggish or pale, IMMEDIATELY return them to the warmth of the brooder or close it up with them inside if possible – these are early symptoms of becoming too cold which can lead to death even in your hands
- R-com Minis don’t have insulation so it’s a good idea to place cloth, non-scented absorbent paper towels, or some other substrate to keep the babies warm
- Allow a resting period, season or break for parents after every 3 clutches
- Yeast infection = sour crop = thrush
- Possible causes of crop stasis or “slow crop” include feeding cold formula, feeding too much formula, incorrect incubator temperatures or an infection
- Tape the lid sensor down inside of the R-com mini brooders so it will continue to dispense warm air even while you are feeding them with the top off
- Quail eggs are about 3x the size of Finch eggs so you are able to fit 3-4 Finch eggs in a Quail egg slot
- BE CAREFUL not to drop the lid of the brooder, it can injure hatchlings or smash eggs
Q-tips are great for helping clean up hatchlings after feedings but DO NOT let them drink from the Q-tips because they have a slight powder to them which is unsafe for babies to ingest ~ Also be sure to “rinse” babies after using Q-tips on their skin to remove the powder residue